Webhooks distribution allows users to share scheduled publications, alerts, and subscriptions with others via a Webhook channel When configuring Webhook distribution for publications and advanced alerts, you can edit existing channels and add new channels via the Channels dialog.
Note: This feature is only available with the Enterprise Edition license.
Important: The Channels tab is only available for selection by subscribers where the Normal option has been selected in the administrative settings for subscribe.
Access the Channels Dialog
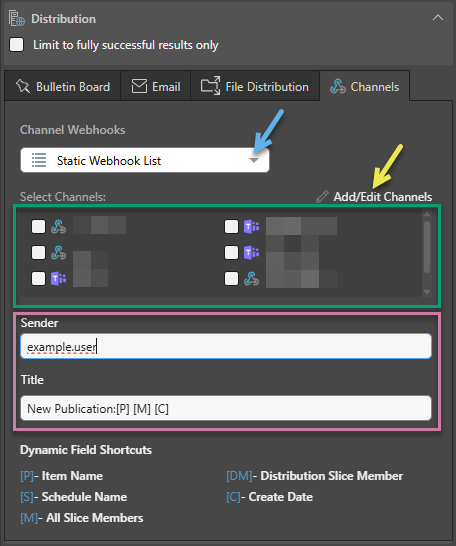
To access the Channels dialog, open the Channels tab from the Distribution window and choose Static Webhook List from the dropdown list (blue arrow below). This allows you to configure static distribution to a channel via a Webhook.
You can select the required channels from the list (green highlight), or edit or add channels by clicking Add/ Edit Channels (yellow arrow).
Note: The Add / Edit Channels button is only shown when it's enabled for the current tenant from the Admin console.
Add/Edit Channels
From the Add/Edit Channels dialog, you can edit or delete channels that you created, and add new channels:
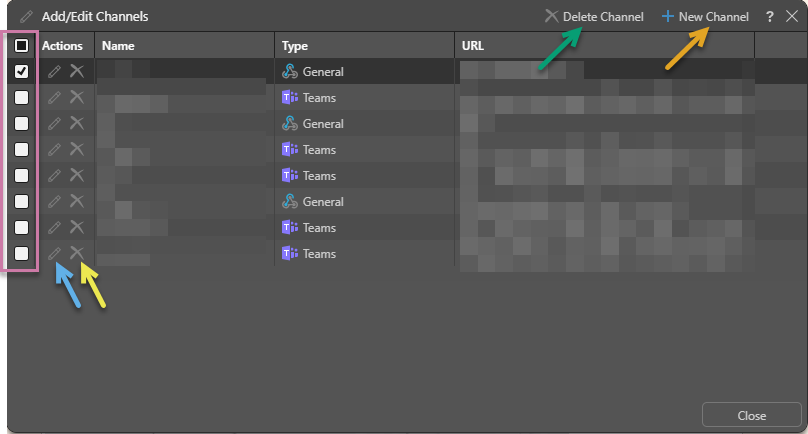
Channels List
The channels list displays the following columns for each channel:
- Actions: You can edit or delete an item from here.
- Name: The name of the channel.
- Type: The channel type; one of General, Slack, or Teams.
- URL: The channel URL.
Actions
Actions are available from the Actions column of each listed channel:
- Click Edit (blue arrow above) to open the Edit Channel dialog.
- Click Delete Channel (yellow arrow) to delete the channels. You can only delete channels that were created by you.
Header Actions
Other actions are available from the dialog header:
- Delete Channel: Select the checkbox (purple highlight) of the relevant channels and click Delete Channel (green arrow). You can only delete channels that were created by you.
- New Channel: Add a new channel (orange arrow). The new channel will only be visible to you; if you want to share a channel with other users, it must be created using the Admin console. For more information, see Add
Edit Channel
You can edit channels that were created by you; you cannot edit channels created by another user, except for in the Admin console.
When you choose to edit an existing channel, its details will be displayed in the Edit Channel Webhook dialog. You will be able to edit all of the channel's properties, including the channel type, title or sender, and URL.
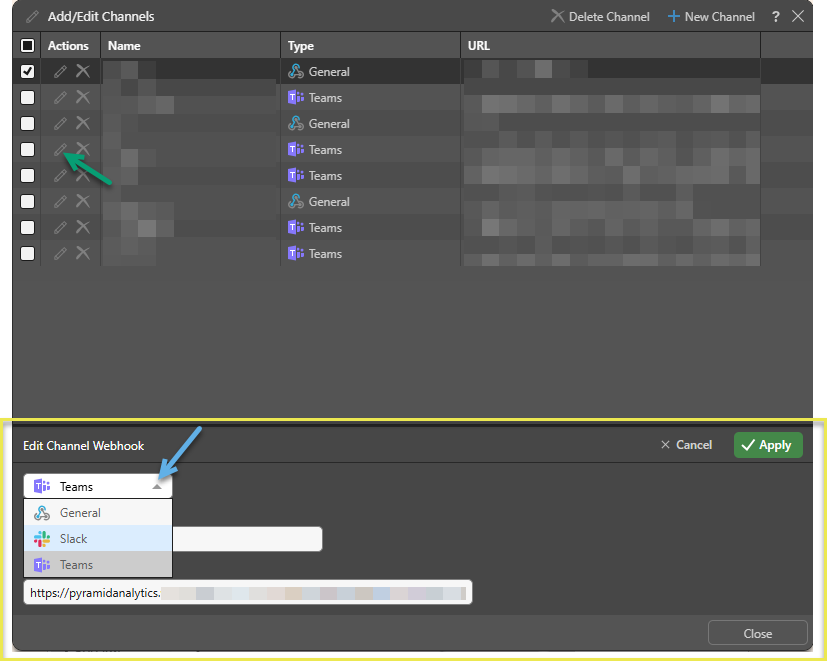
Click Apply to save your changes before closing the dialog.
Add New Channel
Channels that you add from the Channels dialog are visible only to you; other users cannot see these channels. If you want to create a channel that other users and roles will be able to distribute content to, it must be created in the Admin console.

When adding a new channel, you'll need to specify the channel type (General, Slack, or Teams), and provide the channel URL. Once you've configured the new channel, it will be added to list of channels in the Channel Distribution window for selection.
General
Select this option if you want to distribute to a channel that is not Slack or Teams:
- Name: The name that will appear in the list of channels in Pyramid.
- URL: Paste the URL of the channel where the Webhook will be sent.
Slack
Choose this option if you want to distribute to a Slack channel:
- Name: The name that will appear in the list of channels in Pyramid.
- Sender: The a Slack channel or username.
- URL: Paste the URL of the Slack channel.
- Click here to learn how to get the channel URL for Slack.
Teams
Choose this option if you want to distribute to a Teams channel:
- Name: The name that will appear in the list of channels in Pyramid.
- Title: The message title that will appear in Teams.
- URL: Paste the URL of the Teams channel.
- Click here to learn how to get the channel URL for Teams.